 Owncast はカスタムプラグインをサポートするようになりました。
Packaging & publishing plugins
プラグインの配布形式は .ocpkg ファイルです: 1つのバンドルに plugin.manifest.json、プラグインのコード、public/ および assets/ ディレクトリ、そしてオプションでアイコンと説明ドキュメントが含まれます。 その1つのファイルが、サーバー管理者がプラグインをインストールするために必要なすべてです。
パッケージの作成
- JavaScript
- Python
- Native WebAssembly
npm run package
npm run package only rebuilds when the bundle is missing. After changing source, run npm run build first so the package doesn't ship stale code.
owncast-plugin-py package my-plugin
Use your language toolchain to compile the module, then package it as a ZIP with
the canonical plugin.wasm filename. The
Native WebAssembly guide includes build
commands for Rust, TinyGo, and AssemblyScript.
The resulting \<your-slug>.ocpkg contains the manifest and runnable code. It can also include the plugin's public/ and assets/ directories.
The JavaScript and Python packagers run the built plugin through owncast-plugin-test --load-only before writing the archive. This uses the same install-time load path as a real server, covering register(), manifest and runtime agreement, and permission-gated subscriptions. Native WebAssembly authors run owncast-plugin-test directly before packaging. See Native WebAssembly: Test before installing.
そのファイルは自己完結しています。 好きな方法で共有してください:
- GitHubのリリースに添付する
- 自身のサーバーでホストする
- チャットやメールで管理者に渡す
プラグインアイコン
プロジェクトのルートに icon.png を置く(plugin.manifest.json と同じ場所)と、パッケージャーがそれを自動的に .ocpkg にバンドルします。 管理UIは /api/plugins/\<your-slug>/icon から取得し、プラグイン一覧および管理ページを提供するプラグインのサイドバー項目に表示します。
my-plugin/
├── plugin.manifest.json
├── icon.png              bundled automatically
├── src/
├── public/
└── assets/
注意:
- 権限は不要です。 ホストがアイコンを直接提供します。
http.serveは不要です。 - このアイコンはアクションボタンのアイコンとは別物です。アクションボタンのアイコンは
public/に置かれ(ウェブ提供され)、actions[]エントリのiconフィールドで参照されます。 詳細は UI: アクションボタン を参照してください。
説明
プロジェクトのルート(plugin.manifest.json と同じ場所)に INSTRUCTIONS.md を置くと、パッケージャーがそれを自動的に .ocpkg にバンドルします。 管理UIは /api/admin/plugins/\<your-slug>/instructions から取得し、プラグインの詳細ページの Instructions タブにマークダウンとして表示します。
my-plugin/
├── plugin.manifest.json
├── INSTRUCTIONS.md          bundled automatically
├── src/
├── public/
└── assets/
これをセットアップ手順、設定メモ、要求している権限とその理由、インストール後に管理者が知る必要があるその他の情報に使ってください。 それを持たないプラグインは Instructions タブが表示されません。 ファイル名は固定です(INSTRUCTIONS.md)。 http.serve 権限は不要です。
このファイルは管理者向けなので、プラグインをインストールした配信者が管理UIを開いて使い方を理解するための内容を書くようにしてください。 開発者向けの README スタイルのメモは、代わりにリポジトリの README に置いてください。
.ocpkg に含まれるもの
plugin.manifest.json- One code entry:
plugin.js,plugin.py, orplugin.wasm icon.png(提供している場合)INSTRUCTIONS.md(提供している場合)- あなたの
public/ディレクトリの内容(存在する場合、/plugins/\<slug>/でウェブ提供されます) - あなたの
assets/ディレクトリの内容(存在する場合。マニフェスト内でインライン化されたコンテンツ用にホストから読み取られます)
The code filename selects the runtime. A native module must be named plugin.wasm inside the archive, regardless of the plugin slug.
Build inputs such as node_modules, package.json, pyproject.toml, Cargo.toml, and uncompiled source do not belong in the package. They produce the code entry that the server runs.
Loose native WebAssembly files
During development, a native module can be installed without creating an .ocpkg. Copy the module and manifest into data/plugins/ with the same basename:
data/plugins/
├── my-plugin.wasm
└── my-plugin.manifest.json
Owncast scans for the .wasm file and reads the matching .manifest.json. The packaged .ocpkg format is still recommended for distribution because it keeps the code, manifest, and optional assets together.
サーバーへのインストール
Owncast の管理画面で、サイドバーの Plugins を開き、Upload plugin をクリックします。 .ocpkg を選ぶとサーバーがその場でインストールします。 新しいプラグインはすぐに一覧に表示されます。
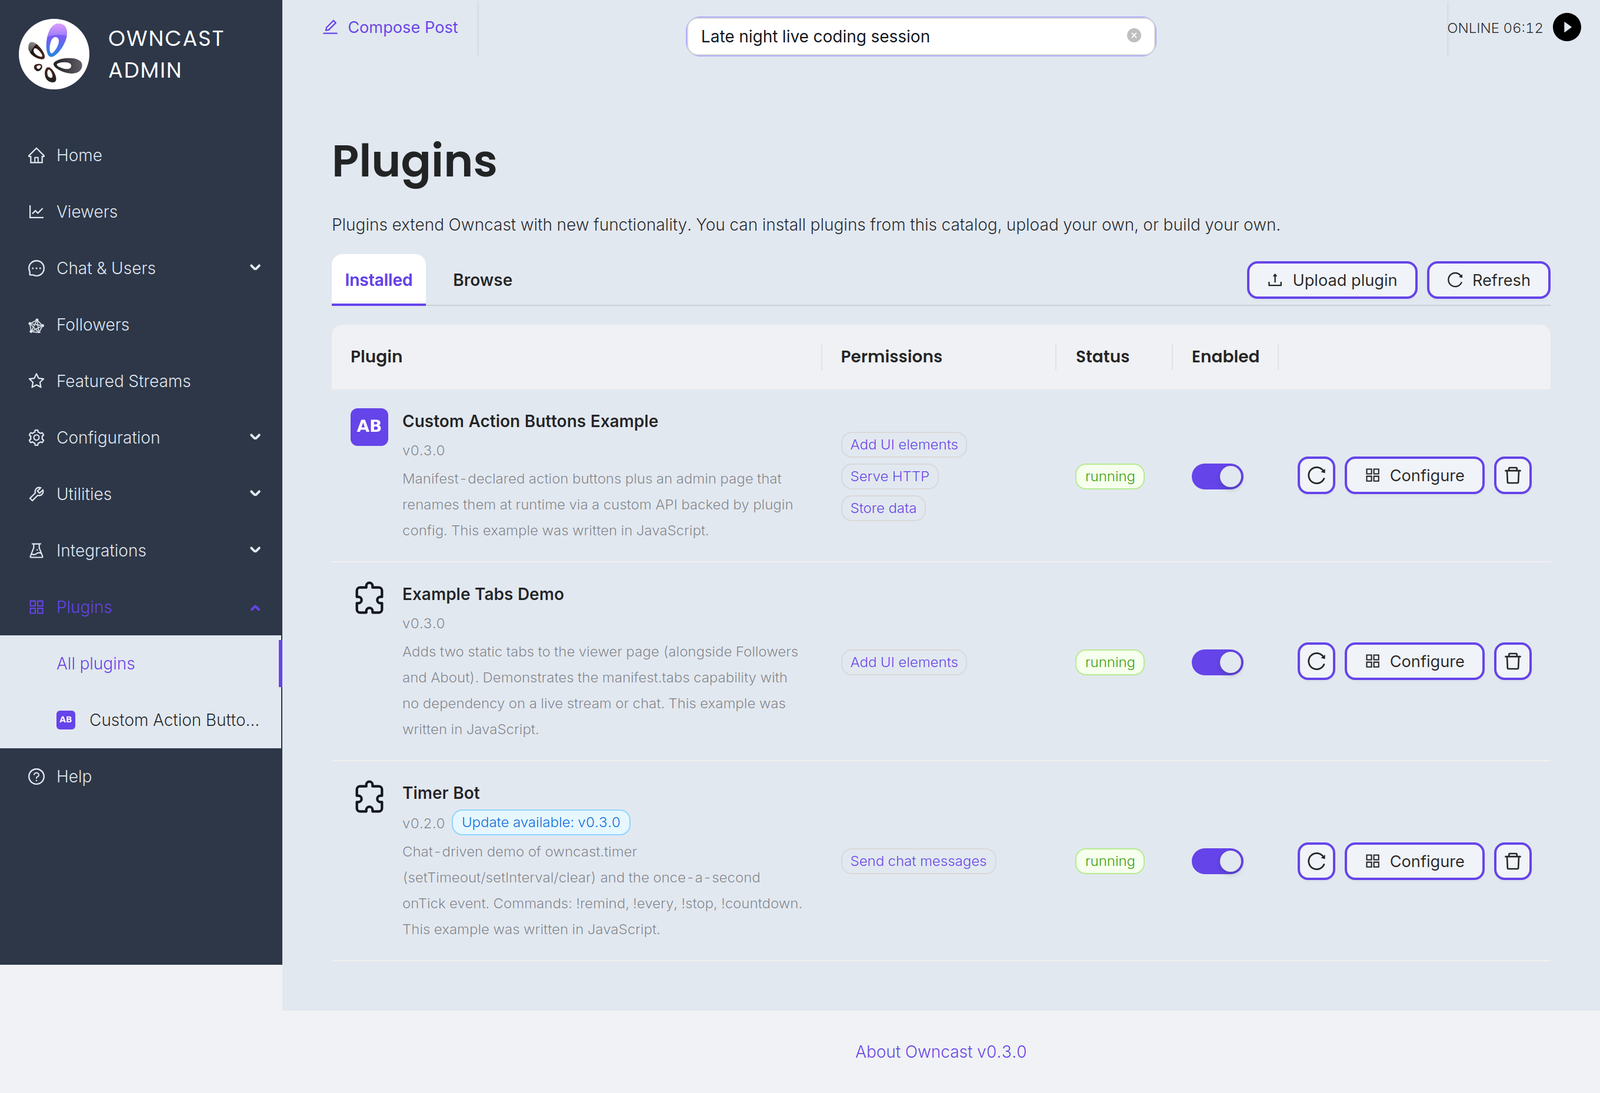
管理UI が利用できない場合(自動化、ブラウザアクセス不可、スクリプトによるデプロイなど)、.ocpkg をサーバーの data/plugins/ ディレクトリに直接置くこともできます:
scp my-plugin.ocpkg user@your-owncast-server:/path/to/owncast/data/plugins/
サーバーはこのディレクトリを定期的にスキャンします。 プラグインは数秒以内に管理画面の Plugins ページに表示されます。
いずれの場合も、管理画面でインストールを完了してください:
- 一覧でプラグインをクリックして詳細ビューを開きます。
- Permissions タブを確認してください。 これらはマニフェストで宣言したものと同一です。
- Enabled を切り替えてプラグインを読み込みます。 初回の有効化時に、承認された権限セットが記録されます。
インストール済みプラグインの更新
To ship an update, replace the package file in data/plugins/ directly, or install the new version from the admin's Browse tab if you publish to the directory. The manifest's slug is the identity key: the new contents replace the existing entry with the same slug, whatever the file was called. 有効なプラグインを即時にリロードさせるには、その行の Reload をクリックします。
Uploading from the admin's Plugins page only installs a new plugin. An upload whose slug already belongs to an installed plugin is rejected ("uninstall it before uploading another plugin with the same slug"), so uninstall the old one first if the admin upload is your only update path.
Two files in data/plugins/ that declare the same slug are also a conflict. Owncast keeps the first one it finds, ignores the other, and logs which package was skipped.
権限が変更されたときに起きること
- 権限を削除した場合。 何も通知されません。 プラグインは削減された権限セットでリロードされます。
- 権限を追加した場合。 The old approved version keeps running (it holds only the approved permissions) and the new package waits as pending, with a "needs re-approval" badge in the plugin list. The admin reviews the new permissions in the Permissions tab (new entries are tagged) and clicks Approve to accept the expanded set and load the update.
プラグインの実際の権限は、アップデートを含め、管理者の明示的な同意なしに増えることはありません。
バージョンの更新
リリースを切るたびに plugin.manifest.json の version を上げてください。 It's what admins see in the plugin list and what the registry uses to tell releases apart. The host doesn't gate loading on it: update identity is the slug, and the load-time check compares slug and permissions, not version.
バージョン管理は人間のためのものです。 セマンティックバージョニング(Semver)が推奨されますが、強制はされません。
無効化とアンインストール
- 無効化(Disable)はプラグインをインストール済みのままにし、読み込みを停止します。 管理者の選択は再起動後も保持されます。 再度読み込むには Enabled をオンに切り替えます。
- アンインストール(Uninstall)はプラグインを完全に削除します。 管理画面の Plugins ページで該当プラグインの行のゴミ箱アイコンをクリックし、確認します。 (
.ocpkgをdata/plugins/から直接削除してもよく、次回のスキャンで削除が反映されます。)
配布チェックリスト
プラグインを公開する前に:
- マニフェストは使用するものだけを宣言してください。 未使用の権限は削除してください。 要求する権限が少ないほど、管理者が信頼する判断は容易になります。
descriptionが記入されていること。 管理者はプラグイン一覧やインストール時にそれを見ます。 プラグインの機能を説明する一文。versionが実際に出荷する内容を反映していること。 Semver が慣例です。- リポジトリの README に、何をするプラグインか、どの権限を要求してその理由、設定すべき項目(環境変数、管理ページの設定など)を説明してください。
- テストが通っていること。 SDK のテストコマンドが成功(グリーン)であること。
- アイコンがある場合は含めてください。
INSTRUCTIONS.mdには、インストール後に管理者が知る必要のある内容(セットアップ手順、設定メモ、各権限が要求される理由など)を記載してください。 挙動が自明でないプラグインや必須の設定があるプラグインは、INSTRUCTIONS.mdを同梱するべきです。 簡単なプラグイン(例: hello-world チャットハンドラー)は不要です。
ディレクトリへの公開
公開ディレクトリ owncast.directory にプラグインを掲載するかは任意です。 .ocpkg は自己完結型なので、常に管理者に直接渡すことができます。 ディレクトリはプラグインを見つけやすくし、管理者にワンクリックでのインストールと更新を提供します。
いくつかのマニフェストフィールドがリスティングに影響するため、まずそれらを記入してください: name(表示名)、version(更新ごとに上げてください)、slug(永久的な識別子、詳しくは マニフェスト を参照)、description(カード上の一行要約)、permissions(最小限にして管理者がレビューします)、およびオプションの icon.png。
サインイン
ディレクトリはパスワード不要のマジックリンクによるサインインを使用します。 owncast.directory/plugins/login に行き、メールアドレスを入力して受信トレイのリンクをクリックしてください。 あなたのメールアドレスが著者の識別子となり、所有するプラグインに紐付けられます。 アカウントページで、リスティング上に著者として表示されるオプションの表示名を設定できます。
提出
owncast.directory/plugins/submit に行き、あなたの .ocpkg をアップロードしてください。 ディレクトリはマニフェストを読み込み、パッケージを検証し、そのバージョンを公開します。 提出はウェブサイトを通じて行われ、現時点ではコマンドラインでの公開手順はありません。 フォームはまたいくつかのオプションを受け付けます: プレビュー画像(スクリーンショット、PNG または JPEG、最大 5 MB)、ホームページリンク、ブラウズ用タグ、そしてマニフェストの description を上書きする要約。
所有権と更新
- 最初に提出した者が slug の所有者となります。 slug を初めて公開すると、それはあなたのアカウントに紐付けられ、他の誰もその slug で公開できなくなります。 他の著者が所有する slug への提出は拒否されます。
- 各バージョンは一度だけ公開されます。 更新を配布するには、マニフェストの
versionを上げ、再パッケージ化して再度提出してください。 - owncast.directory/plugins/account でプラグインを管理できます。そこでは公開したすべてを確認したり、リスティングを削除したりできます。
運営者が見るもの
ディレクトリの Browse ビューでは、あなたのプラグインは名前、作者、説明、アイコン、最新バージョン、およびプレビュー画像(アップロードしていれば)を表示します。 管理者がインストールすると、Owncast はマニフェストが要求する権限を表示し、あなたの INSTRUCTIONS.md をレンダリングし、登録したチャットコマンドを一覧表示します。 そのメタデータは運営者がプラグインを信頼し有効化するか判断するために使われるので、その読者を念頭に置いて記述してください。
次に進むべき場所
- マニフェストリファレンス — マニフェストフィールドの完全な一覧。
- 権限 — 信頼モデルと権限の完全なリスト。
- Example plugins: JavaScript · Python.
Improve this page
See something missing or incorrect? Edit this page and improve the documentation for everyone.
 Gabe Kangas